Learning Goal: Understand how to write a program to control a robot.
Lesson 6 - Touch sensor
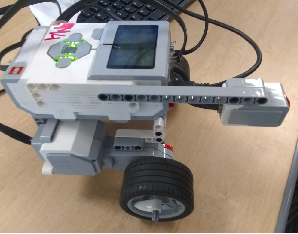
Add a touch sensor to the front of your robot.
A simple way to do this is to attach the touch sensor to a beam, and attach the beam to the brick body.
Use at least two pegs to keep it stable. Make the touch sensor stick out in front of the robot.
..........................................
Watch this video lesson:
Part 1. Program your robot to move forward until the touch sensor is pressed, then stop.
Expand your program so that the robot is able to autonomously
- move forward until it hits an obstacle with its touch sensor
- then
backs up
- then turns and goes forward again.
- Use a loop in the
programming so that the robot performs these steps forever
as it explores a new
environment.
Make sure it is annotated. Save it as Touch1Yourname.
To turn it in
- Go to Google Drive or watch this video:
- Open the Class Assignments LEGO folder in 'Shared with me'
- Open your class folder and assignment folder
- Click on the "New" button on the top left
- Upload the program from your computer as Touch1yourname.
Part 2. Program the robot to start when you press the touch sensor, drive forward, then spin.
Make sure it is annotated. Save it as 'Touch2Yourname'.
To turn it in
- Go to Google Drive or watch this video:
- Open the Class Programs LEGO folder in 'Shared with me'
- Open your class folder and assignment folder
- Click on the "New" button on the top left
- Upload the program from your computer as Touch2yourname.
Reflect on what you learned in this assignment.
|
